Contents
1 Overview
This tutorial describes how to use the Ridom SeqSphere+ software to analyze single target Sanger sequence data (chromatogram files) with a nucleotide reference sequence library. Exemplarily HCV sequences (partial NS5B gene) are typed here using a reference library for HCV subtyping created by downloading data from the NCBI virus genotyping web service. Please not that this NCBI resource works with complete genome sequences whereas in this example only a small part of the genome is used. The NCBI service breaks a query sequence into segments for comparison to the reference so that the mosaic organization of recombinant sequences can be revealed. No segmentation of the short user sequences is done here.
2 Preliminaries
- This tutorial requires a running SeqSphere+ client and server. Start the SeqSphere+ server, then start the SeqSphere+ client and initialize the database. For evaluation purpose a free evaluation license can be requested.
- Download the example data archive SeqSphere_Examples_Sanger_HCV.zip
3 Building a Reference Sequence Library
- Step 1: First, a nucleotide reference sequence library is required to create a Task Template. This reference sequence library must have a multiple FASTA file format, where the FASTA headers contain the allele names and the result type(s) separated by a single delimiter. If such a library is already available for your use case, this section can be skipped.
- For this tutorial no finished FASTA library is available. Only the reference accession numbers and the genotyping information are available and must be used to create the FASTA library manually. If you want to skip this section, you can directly download the prepared library file HCV_subtypes.fasta.
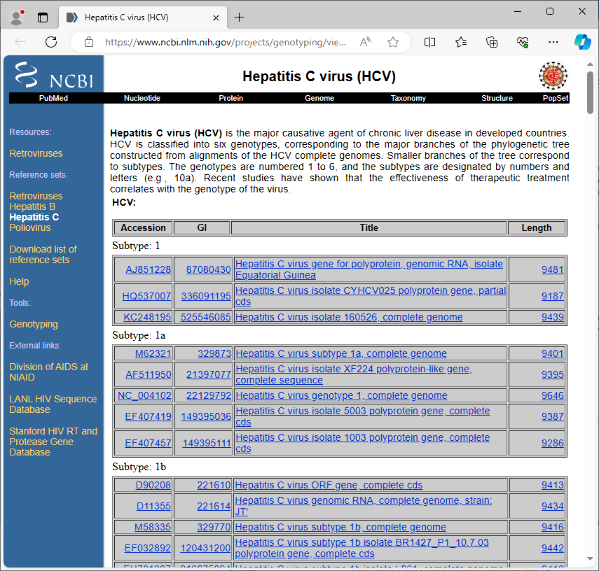
- Step 2: Go to the NCBI Virus Genotyping Tool for HCV. This page shows the accession numbers of the reference genomes that are used by the web service, together with the genotypes. Create a list of all listed 174 accession numbers (e.g., by selecting the whole table, pasting into Excel, and deleting everything but the accession numbers). Finally, copy the list or column of accession numbers to the clipboard.
- Step 3: In SeqSphere invoke the menu function Tools | Download from NCBI Genomes.
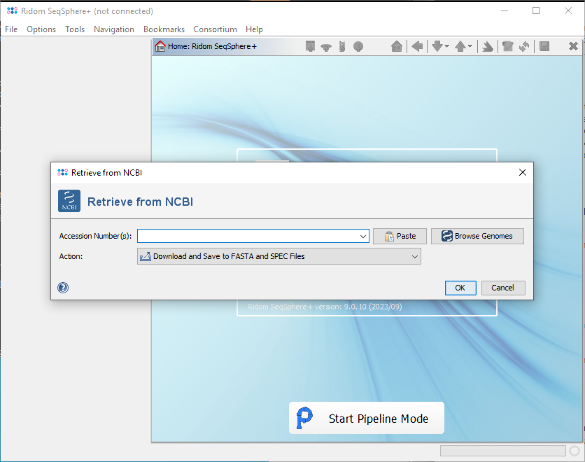
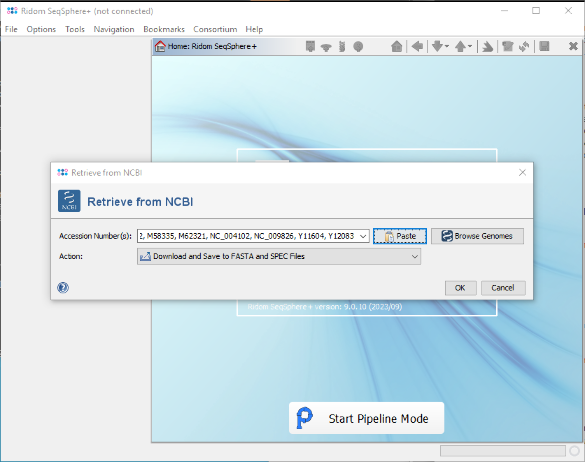
- Step 4: In the upcoming window press the button Paste, then Paste from Clipboard. The 174 accession numbers from the clipboard are added to a list.

- Step 5: Confirm the paste dialog to add them to the Accession Number(s) field of the Retrieve from NCBI window. Then choose as Action the option Download and Save to GB Files (...) and confirm the window.
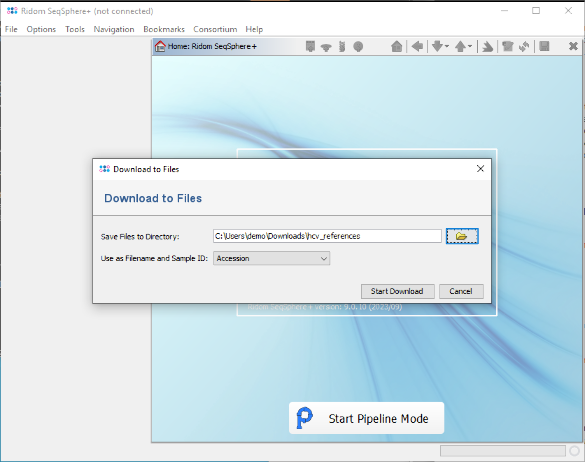
- Step 6: Finally select a directory to download the FASTA files to, and choose for the Filename and Sample ID the option Accession. Then confirm to start the download.
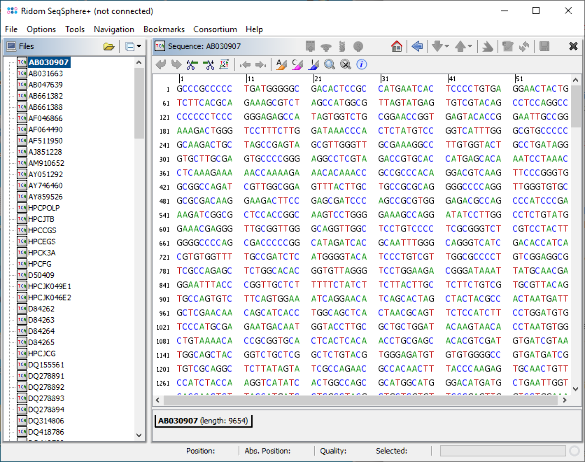
- Step 7: After the download has finished, invoke in the menu File | Open, select all 174 downloaded GB files, and confirm the dialog. Another dialog appears that must be confirmed by clicking on Load Sequences.
- Step 8: Now invoke the menu function Tools | Gene Utilities | Create Sequence Library, select all 174 sequences by pressing the button Select All, and confirm the dialog. Then enter a name for this sequence library (e.g., "HCV_subtypes") and confirm the dialog.
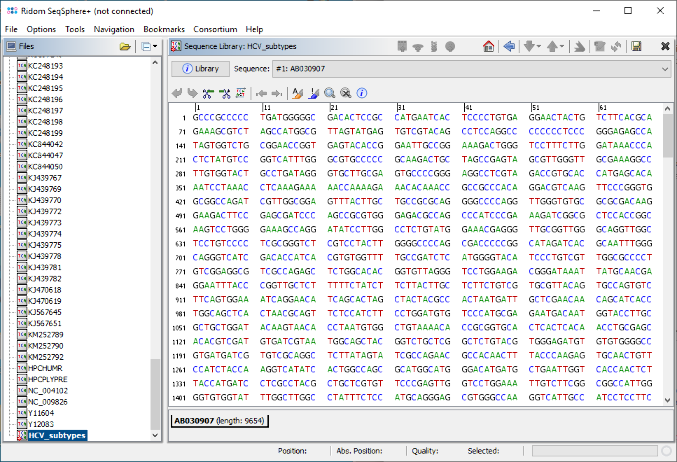
- Step 9: The sequence library is now created and opened in the workspace. Press the save button in the upper right corner to store it to a FASTA file. Finally invoke in the menu File | Close All to close all sequences files that were opened.
- Step 10: Now open the FASTA file of the sequence library in your favorite text editor, and append to each FASTA header the subtype according to NCBI HCV genotyping ressource, separated from the accession by a blank character. The final FASTA file should look like below or this:
>AB030907 2b
GCCCGCCCCCTGATGGGGGCGACACTCCGCCATGAATCACTCCCCTGTGAGGAAC...

>AB031663 2k
TGCCCGCCCCTAAATGGGGCGACACTCCGCCATGAATCACTCCCCTGTGAGGAAC...

>AB047639 2a
ACCTGCCCCTAATAGGGGCGACACTCCGCCATGAATCACTCCCCTGTGAGGAACT...

...
4 Creating Project and Task Template
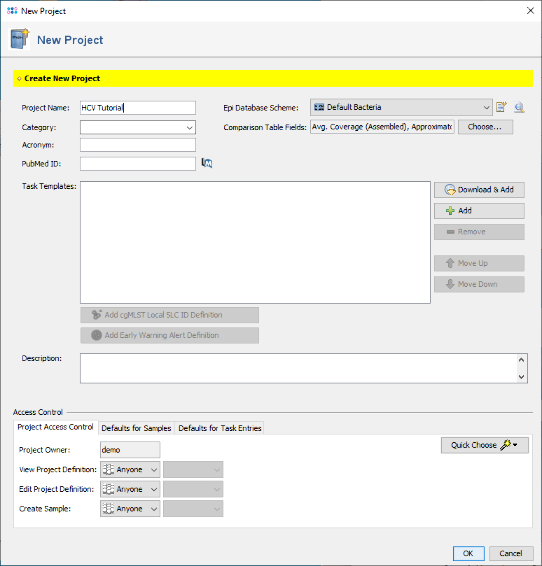
- Step 1: To create a new Project for use with your sample data invoke the menu command File | New | Create Project. In the upcoming window enter a Name for the new project (e.g., HCV Tutorial).
- Step 2: Press
 Add in the Task Templates section. In the upcoming window that shows all available Task Templates click on the button Create New.
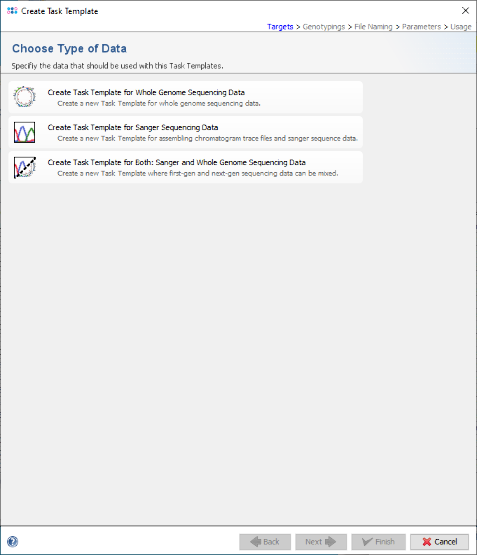
- Step 3: Click on the option Create Task Template for Sanger Sequencing Data.
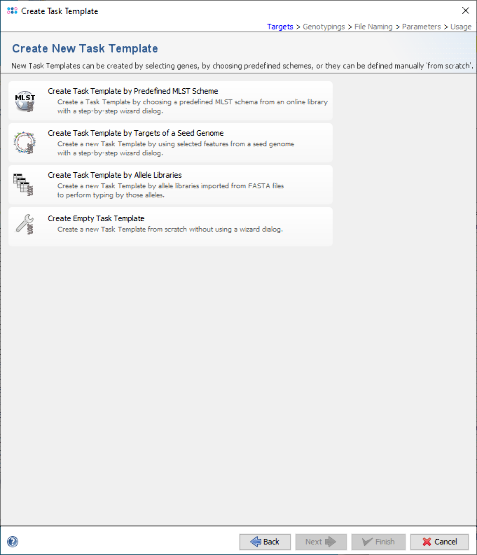
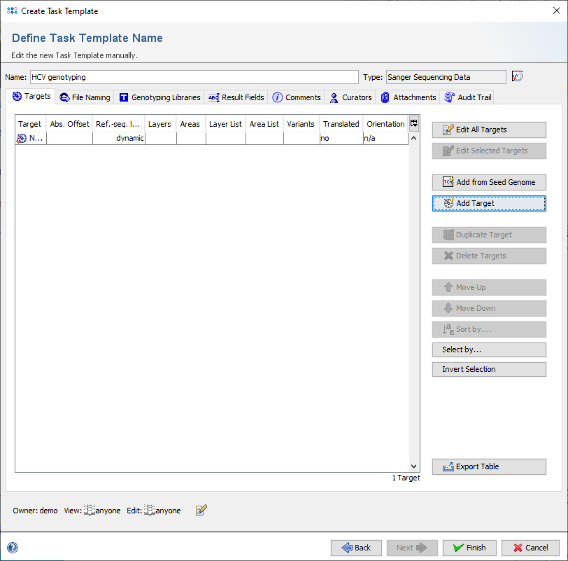
- Step 4: Then click on the option Create Empty Task Template.
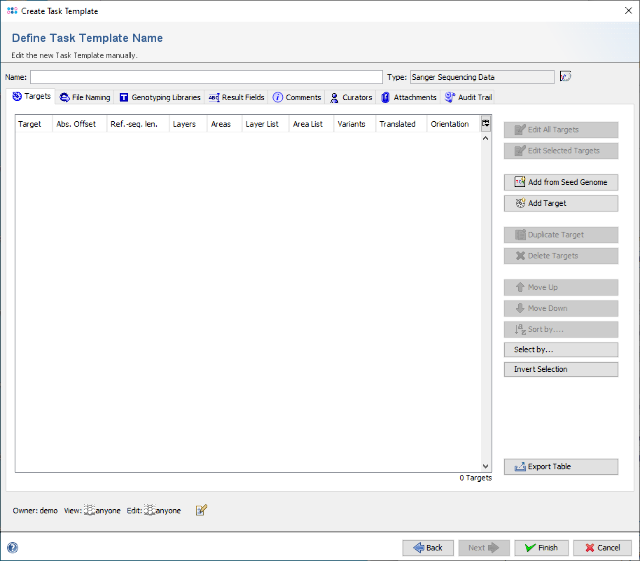
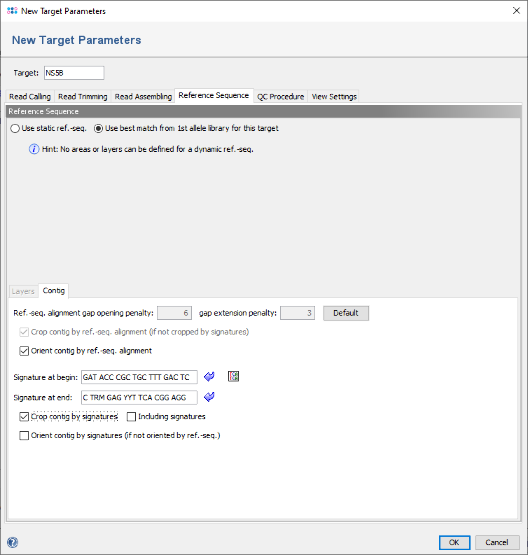
- Step 5: The editor for the new Task Template is shown. Press the button Add Target to add a new target locus to the Task Template. In the upcoming dialog enter in the top of the window as name for example NS5B and click on the tab Reference Sequence. Now select the radio button Use best match from 1st allele library for this target in the top line to change the settings to a dynamic reference sequence.
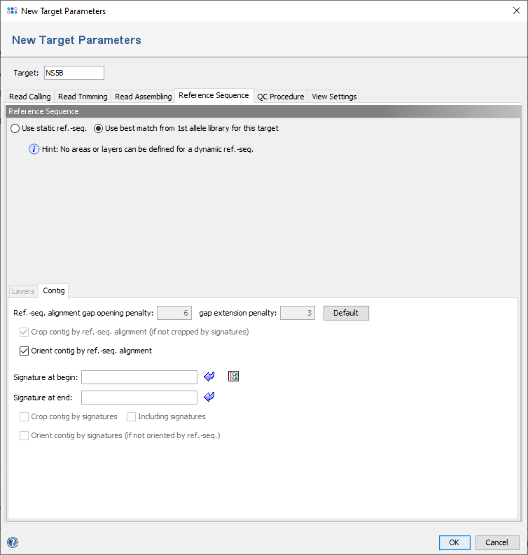
- Step 6: In the panel below add the following two primer sequences as signatures, and select the checkbox Crop contig by signatures.
- GAT ACC CGC TGC TTT GAC TC
- C TRM GAG YYT TCA CGG AGG
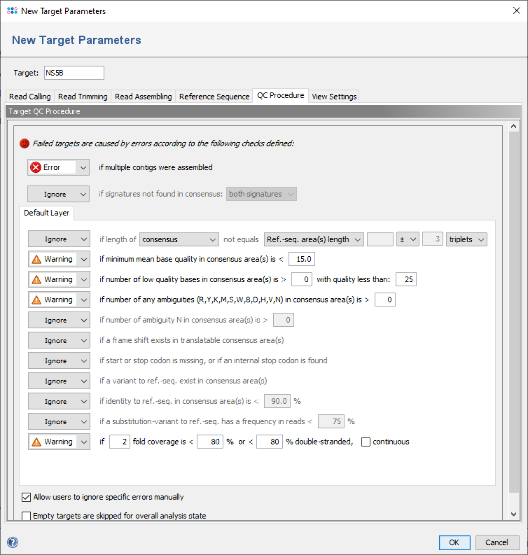
- Step 7: Now click on the tab QC Procedure.

- Step 8: The Default Layer panel shows five QC checks that will result in an error if they not succeed. For the data used in this tutorial, the QC settings must be relaxed. Click on the box of the frame shift check and change it from Error to ignore. Then change the other four checks in section Default Layer from Error to Warning.
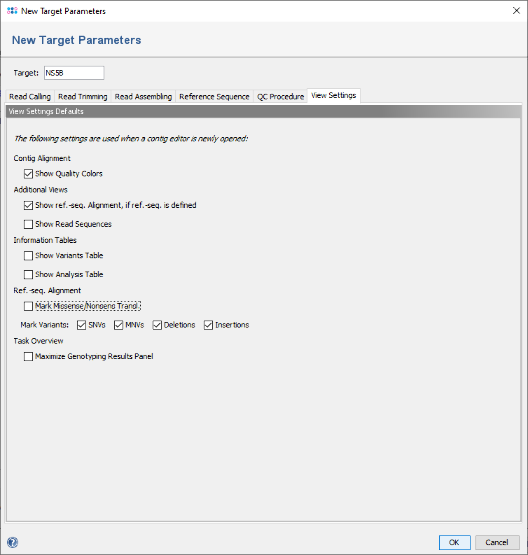
- Step 9: Now click on the tab View Settings. For the example data of this tutorial no translation frame will be detected, as the primers are not found and the reference library is not annotated. Therefore uncheck the box Mark Missense/Nonsens Transl. to disable this highlighting by default.
- Step 10: Finally confirm the target dialog. The new NS5B target appears as row in the Targets section of the Task Template editor.
- Step 11: Now click on the tab Genotyping Libraries and press the button Create New.
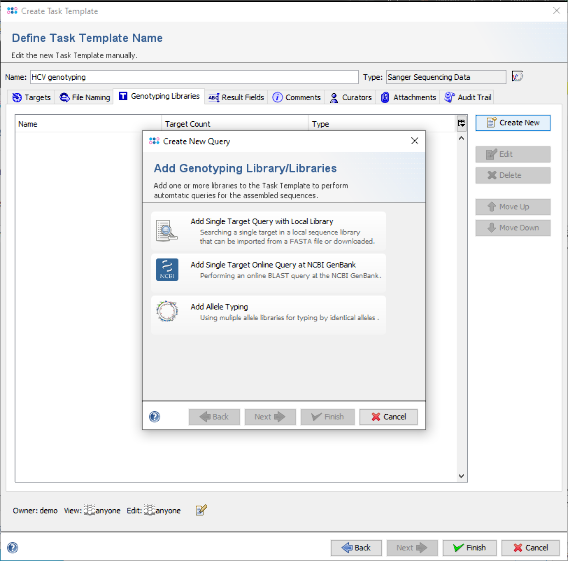
- Step 12: In the upcoming dialog click on the option Add Single Target Query with Local Library.

- Step 13: Now click on the button Import From File anf choose the downloaded or created FASTA library file HCV_subtypes.fasta (see section 3).

- Step 14: The sequences are shown and the name is set automatically from the file name. Now choose in the Split Sequence Name section as Field delimiter the delimiter that is used in the FASTA headers. For this tutorial it is blank. The Example table below the selection box shows the extracted values for the sequence that is currently selected in the list.
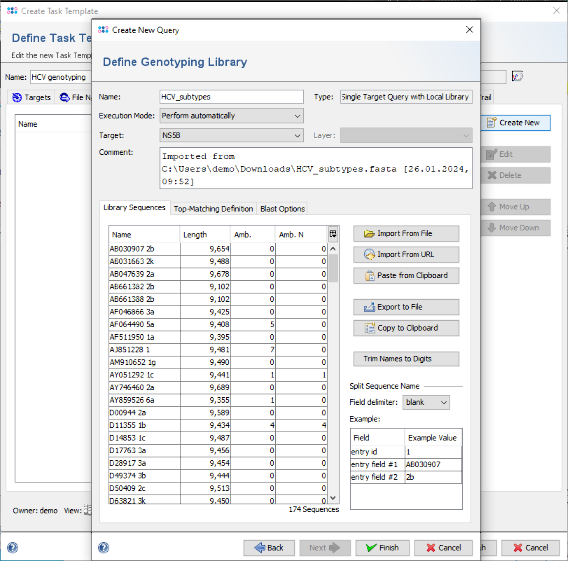
- Step 15: The Example table now shows three rows. From the second row on, the field names in the table can be modified. Double-click in the second row of column Field and change the name from entry field #1 into Accession. Repeat the same for the second row and change it to Subtype. These will be the names of the stored result fields.

- Step 16: Then click on the tab Top-Matching Definition. This defines the thresholds for the BLAST hits. Change the Top-matching identity threshold to 90%.
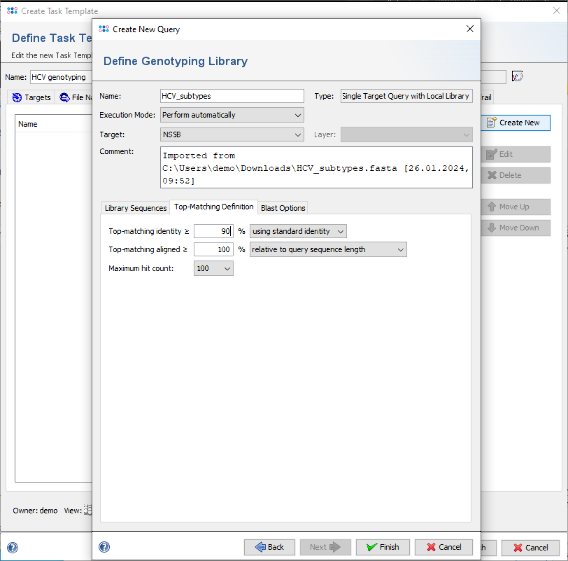
- Step 17: Then press Finish to add the genotyping library to the Task Template.
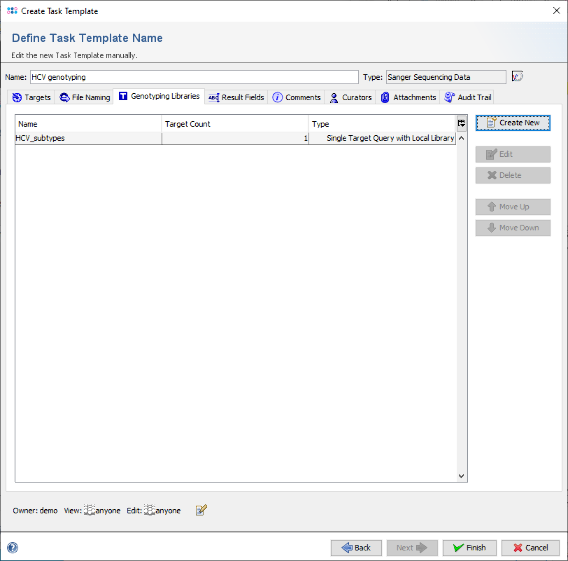
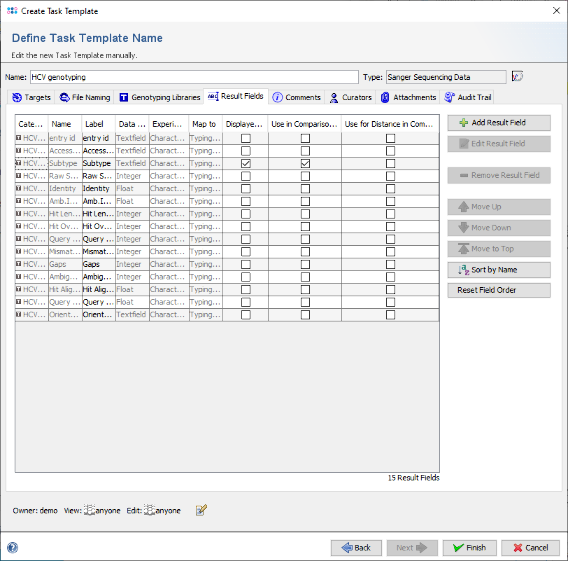
- Step 18: Back in the Task Template editor click on the tab Result Fields.

- Step 19: The result fields of this Task Template are shown. As the field Subtype should be shown in the result overview and in a comparison table, right-click on the third row (with label Subtype) and choose "Set Displayed in Results Check(s)". Note that now the checkbox of the column Display in Results is checked for Subtype. Next right-click again and choose "Set Use in Comparison Table by default Check(s)". Another checkbox is now marked.
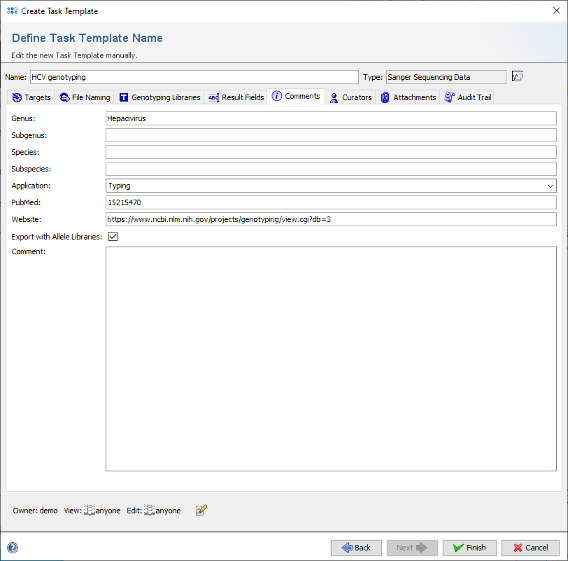
- Step 20: Click on the tab Comments and select the checkbox Export with Allele Libraries. This allows later to export the Task Template together with the reference library to a special file to share it with other SeqSphere users on another SeqSphere server. Optionally, some descriptions can be added to the Task Template here. For example the genus and species can be set, the application can be set to Typing, and a web URL and/or PubMedID can be set for documentation.
- Step 21: Finally confirm the Task Template editor with Finish to add the newly created Task Template to the Project.
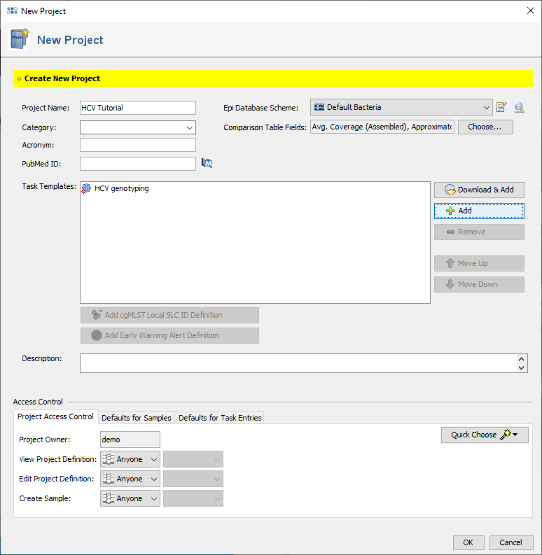
- Step 22: Confirm the New Project dialog by pressing the OK button to store the newly created Project.
5 Assembling and Genotyping Sanger Sequence Data
- Step 1: Choose from the menu File | Process Sanger Sequencing Data. Press the
 button above the file browser panel on the left, and choose the directory where you extracted the tutorial example data.
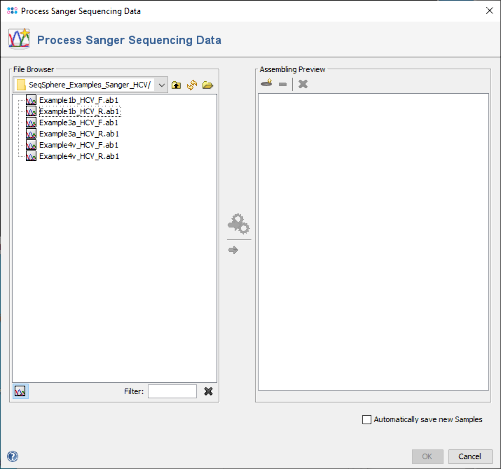
- Step 2: Select the tutorial example data directory or all of the files in it, and press the button
 in the toolbar at the center of the dialog. A new dialog opens up to show how the chromatograms (fragments) are sorted into samples. Be sure that the new HCV project is selected and that the option Match by default File Naming is selected. As the file naming is recognized automatically, the six chromatograms will be sorted into three different samples. If this does not work for your own data later, use the button Edit File Naming to adjust the settings.
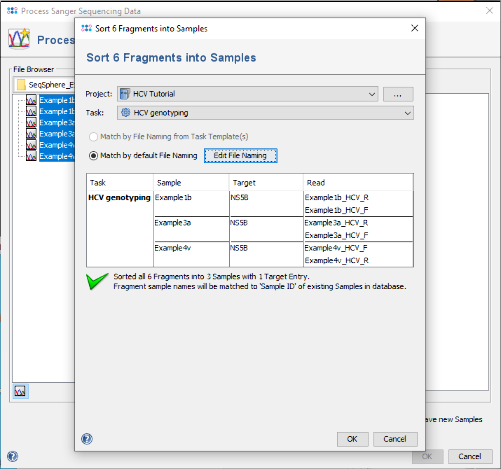
- Step 3: Confirm the dialog with OK. A preview of the three new samples is shown in the right panel highlighted yellow.
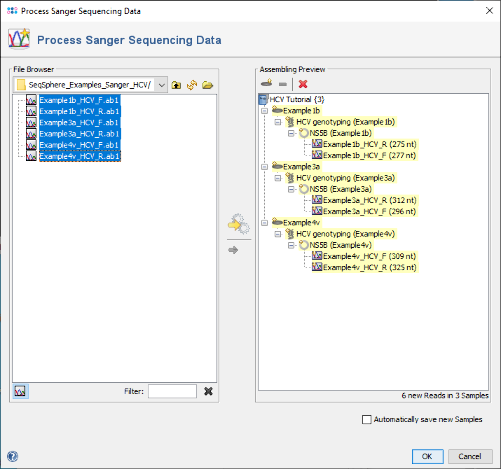
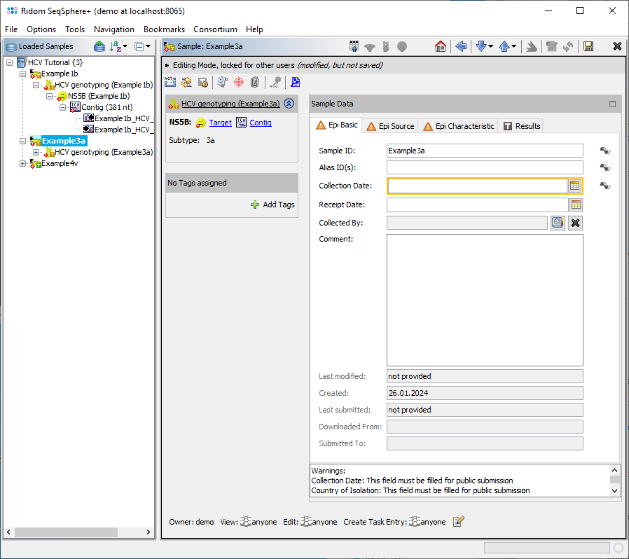
- Step 4: Confirm the dialog by pressing OK to start the assembling and processing of the sequence data. After a short while, the reads are assembled and the three new Samples are listed in the navigation tree on the left of the main window. On the right an overview and the epi metadata of the first Sample is shown. In this overview, there is a section called HCV Subtyping which shows that the Subtype 1b was determined. To see the details, click on HCV Subtyping.
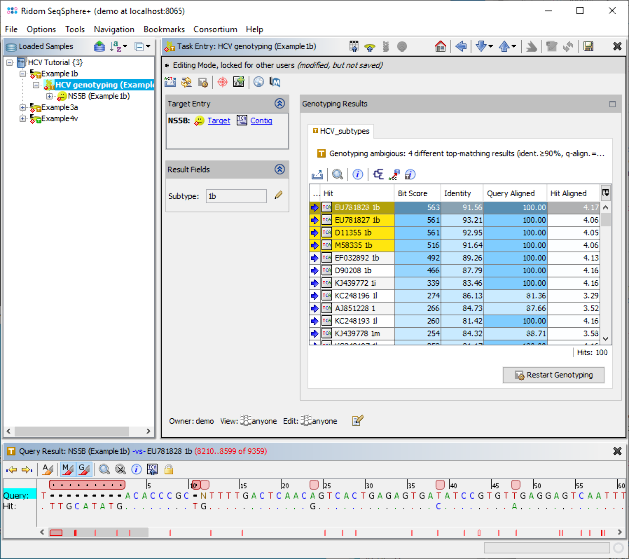
- Step 5: The Task Entry is opened and shows the BLAST result for the search in the reference library. Multiple hits were found above the defined threshold (90% identity), but all belong to the subtype 1b. Therefore this subtype is set in the result field. Left of the BLAST result table, two links are shown for Target and Contig levels. Click on the link Contig.
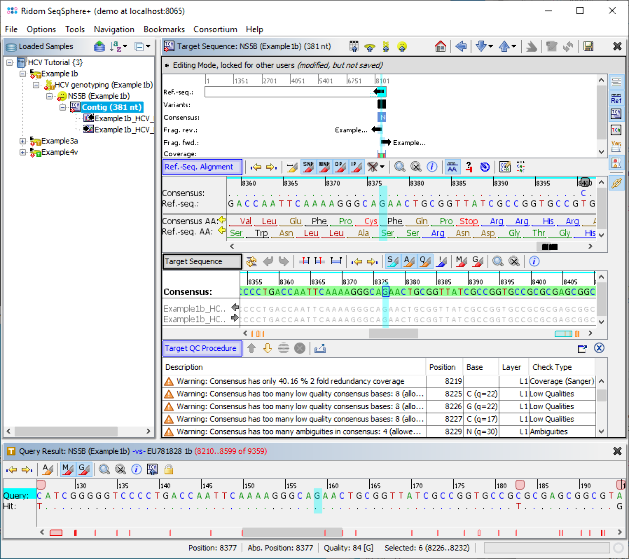
- Step 6: The assembled sequence data for this Sample is shown, aligned against the best matching sequence from the reference library. The signatures were not found, therefore the consensus was not trimmed by the primers. By right-clicking on the consensus in the Target Sequence section, the sequence can be copied to the clipboard for external usage. The Target QC Procdure section below shows some warnings as they were defined in the Task Template. The vertical toolbar on the right allows to show and hide different views for the sequence data. Press the button
 to show the chromatograms.
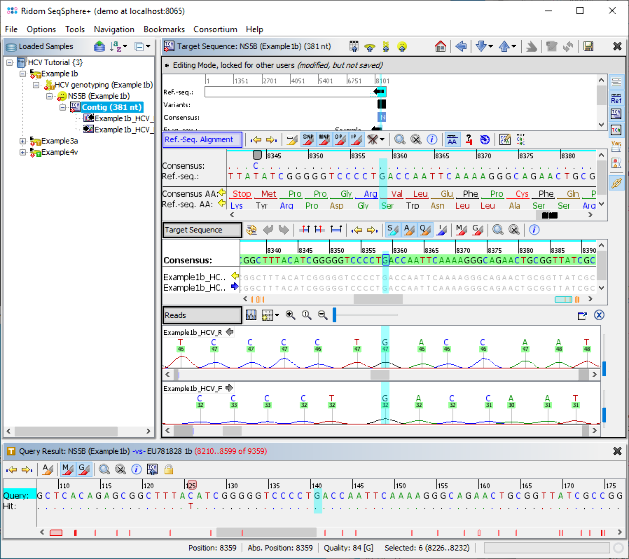
- Step 7: The two chromatograms that were assembled are shown below the Target Sequence. Click on a position on the contig or use the button
 to synchronize the positions between the views. Finally go back to the navigation tree on the left, and dobule-click the other two Samples, to check if they were correctly genotyped as 3a and 4v.
6 Storing and Comparing Samples
- Step 1: Invoke in the menu File | Close All and confirm the dialog with Save & Close to store the Samples together with the sequence data in the SeqSphere+ database. Then invoke the menu command Tools | Comparison Table.
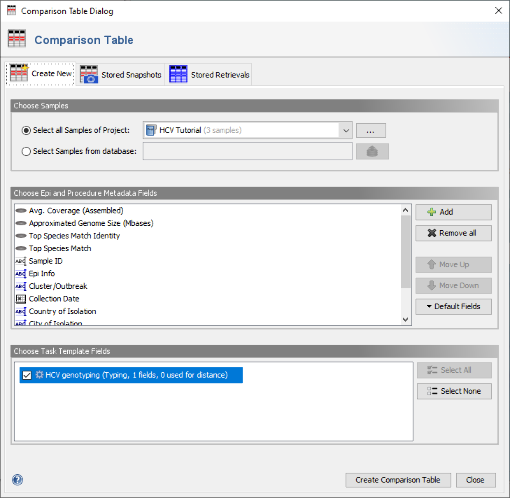
- Step 2: Be sure that the HCV project is selected then confirm the dialog with the Create Comparison Table button.
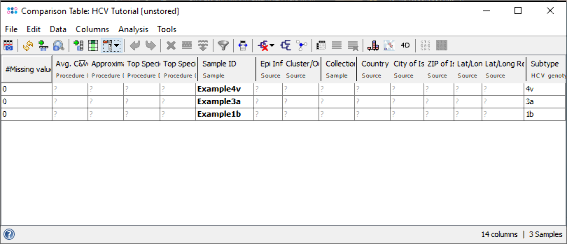
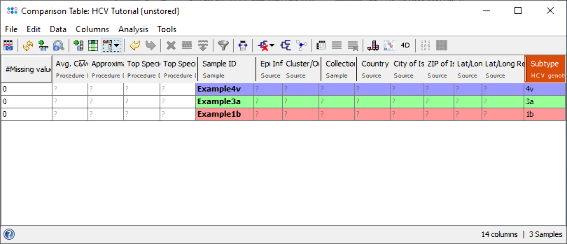
- Step 3: The comparison table opens up, and shows the column Subtype with the stored genotyping results. Finally right-click on the Subtype column header and choose
 Set Color Groups by Column Values to color the samples by the different subtypes.